Way back in February I had the idea of making a piece that had the houses of several close friends and our house, all linked in some way. I asked the friends for quick photos of their homes, but never got the photos. So the project slipped into the recesses of my mind. It was resurrected this weekend when I read about Deborah's "Homegrown" piece. Something about it stirred my need to do a house piece.
I've also been wanting to try the technique of sewing lots of layers of fabric, then cutting away some layers to reveal others. I've seen this done for abstract forms, but not for concrete forms. I thought I'd give it a try.
I used a pile of Blue and Yellows I had been given, and sewed around the outside edges, then sewed a line for the "ground". Next, I went back and sewed a variety of houses on the fabric:
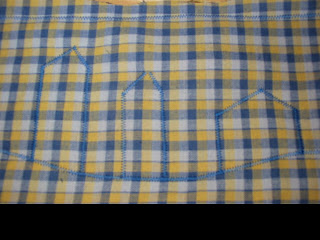
Next, I cut out the top layer of each of my houses. Teeny tiny scissors are very helpful with this step.
(Note the baby monitor in the upper left of this photo, proving this to be true Nap Art.)
Then I cut each house out a different number of layers so that each house was from a unique fabric.
At first, I poked a hole in the middle and then cut diagonally to cut the house out. But then I realized I was able to start at a corner, and cut neatly around the edge, and then I had a perfect little house to use in another project. Can you say Series! ;)
Then, I went back in and sewed unique elements on each house--doors, windows, roofs, etc, and cut them out. This step could be done before the original cuts were made if you were a more organized, plan-it-out artist than I am.
And then, when the houses were done, I cut out all the layers of fabric on the top of the piece to reveal the night sky fabric that was the base for all of it. (This also gave me some wonderful Series Starters you can see if the top right of the above photo.)
I then added some flowers to the foreground and one house, and added a word on each house "Neighbors are nearby & far away" (note: must find better pens that Sharpies).
I cut the batting a bit smaller, fused it to the front, fused it to the backing, cut to size, and zigzagged around the edges.
And I even added the rod pocket.
A Completed Project. Yippee! (Sorry, no good photos of it. I'll try again and post something later.)
Monday, July 30, 2007
Felting so easy a preschooler can do it
I may not be any good at felting soap, but I can do Ziplock Felt. It's a breeze, is really, fun, and I need to find a way to use the felt before my house gets overrun with small felted pieces. ;)
Here's how to do it:
Step 1: Take a 6 inch piece of wool roving. Pull it sideways so it thins out to about square, or maybe 4X6. Place it flat on a table.
Step 2: Repeat step 1, placing it perpendicularlly on top of the first piece (bottom fibers go north/south; next layer fibers go east/west)
Step 3: Repeat again.
Step 4: Using colored roving, pull off dime-sized pieces and place on wool to make design
Step 5: Carefully put wool into a ziplock bag. Add around 1/2 cup of hot water with 1/2 t dish soap (like Dawn). Squeeze all the air out and zip up.
At this point, you can finish now, or just leave it and do the squishing part anytime over the next few weeks.
Step 6: Roll up one way, squish squish squish.
Roll up another way, squish squish squish.
Kneed the felt however you feel like doing it, but make sure the wool all stays in it's flat original layers--don't let it fold over itself or the fold will be felted into it and you won't be able to get it out.
You can make a bunch of these little baggies, and keep them in the car to play with on car trips, or in your purse if you get caught in a boring meeting or a long line. FUN!
Any time you'd like to check it, just open the ziplock and feel the fabric. If it's all bonded together, you're done. If not, get the air out, close up the bag, and keep squooshing.
It will get firmer and firmer (and smaller and smaller) the longer you felt it.
When it's felted, take it out, rinse, and let dry.
Ta-Da!
Wednesday, July 25, 2007
What?! It's NOT all about ME?!
I made a conscious choice to find/allow others to hang the big wheat and water pieces I did with Jo, Anne, and Sara. I thought it would be very stressful for me to Try To Make It Perfect.
I didn't realize how stressful it would be for me to see something VERY different from what I had envisioned. The hangers did a great job with the parameters they had to work in. And I'm very glad I wasn't there for the hanging-- I would have gone all Control Freak, I'm sure.
I imagined the wheat pieces hanging from dowels from the drop ceiling so that you could see both sides, they would move in the breeze, and the would create a feeling of openness but also define the space. It would be a lovely worship area unbesmurched by anything else.
However, I didn't know that several others were also working on schemes to transform the space. And I'd forgotten that the same space was also going to be used for the program and for displays for a variety of different groups.
Thus, we get:
A plastic banner and an Episcopal Flag flanking The Art, with a hard plastic sign slapped right on top of it. Oh, the horror. (Get over it, Helen!)
And if you look to the right of the water in the picture below, you can see part of the Wall-O-Tee-Shirts that someone else had made to transform the space. And the pole for lighting just in front of one of the wheat pieces.
But then look here. This looks fine. (I still would have prefered to get rid of that heavy black curtain. But not bad...)
Oh, do we ever really learn that it's not All About Us?
Saturday, July 21, 2007
8 floor to ceiling Wheat Pieces
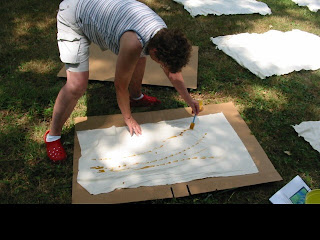
To transform a basement dining hall into a worship space, I thought some hangings would help. I decided to do 4 pairs of wheat in different stages of growth, from new green shoots to ripe golden harvest. Also, these hopefully will be saved and reused in different venues, so decided to paint both side of the fabric so that they will be equally attractive from any direction.
First, lay out your fabric on the grass so you can see all of your work at once. Then, if you're lucky, enlist friends. Thanks, Jo (below), Anne (2 below), and Sara (in River post).
Working on cardboard is easier and will give you more what you expect. Working on grass may create some unusual movement of the paint which may or may not be desired.
We mixed yellow and orange for the harvest wheat and did them, then added much more yellow for the pair that comes earlier in the season. Then we started afresh with light green for the first wheat pair, and then mixed moss green and light green for the next set.
When the first side is dry (or mostly dry), flip over. Much of the paint will have seeped through. Use that as a guideline to repeat the pattern on the back side.
If you are also creating rivers or some other motif, you may want to add a touch of that motif to your hangings. (See water in the corner of the photo below.) Let dry.
Once dry, iron and add 4 inch rod pockets. (Thanks, Susan.) Because these are such big pieces, and the raw silk gives it a rough feel, I didn't hem or turn under and think they look just fine.
How to Make a River
Pre-wash your long swaths of fabric, even if they are PFD (Prepared for Dyeing). There is still a lot of goop to get off of PFD fabric. I used 2 12-yard lengths and 2 18-yard lengths.
Prepare your dye. I used Setacolor, and used about 1 part dye to 5 or 6 parts water for this first wash. (Then about 1:1 for the accent colors.)
Using gloves, dip each section of the cloth into the dye. Dip a section, then pull it out of the dye, wrap undyed fabric around it and squeeze to get the excess dye into the undyed fabric. Having white patches is OK.
Lay out the fabric. Natural wrinkling will occur. Since Setacolor is photosensitive, the wrinkles will be lighter in color than where the fabric is flat. This makes for great water! I chose to lay the fabric in the shade so that the contrasts would be subtle (also I have a shady yard!)
Add bits of complimentary colors. My base color was Turquoise. I brushed on bits of Emerald and Cobalt with a 4 inch paintbrush. Pushing hard on the brush made interesting variations from the grass and rocks underneath the fabric.
Finally, sprinkle salt onto the wet fabric. This is a great addition to give it a watery look.
I added fish while the fabric was still wet. They looked AMAZING for the first 15 minutes, then began to bleed. What I Learned: Add fish after the fabric is dry.
Friday, July 20, 2007
Pay it Forward
It's 1:00 am and I'm blogsurfing because tonight I'm the Parent On Duty for our current Child Who Doesn't Like to Sleep Before 2am. I came across a neat idea on Terry's blog.
So I'm going to Pay it Forward, too. I'm adding a caveat for mine--this will be for the first 3 people who have never left a comment on my blog (Deborah and Jo, if you'd like something, just ask!).
Here are the rest of the rules:
I will send a handmade gift to the first 3 people who leave a comment on my blog requesting to join this PIF exchange. I don’t know what that gift will be yet and you may not receive it tomorrow or next week… LOL… but you will receive it within 365 days, that is my promise! The only thing you have to do in return is pay it forward by making the same promise on your blog.
And HEY! The baby's sleepy! Goodnight.
Tuesday, July 17, 2007
SoulFire
I have a wonderful friend who has the gift and the ability to be a fabulous hostess. She has given me use of her guest house on a couple of occasions now so that I can lead retreats there. She is also really digging into her spiritual life and exploding with all sorts of amazing insights and growth. Something she has recently discovered is her fire, both physically and metaphorically. So I wanted to make her something for the wall where she does her spiritual work.
I used these strips of color to symbolize the bits and pieces she brought together that formed the basis for her firey spiritual work. As the pieces were gathered, they grew.
Next, I placed the fire on a stary background. The background is quilted in 2 inch squares. This symbolized the straight and narrow background she came from before digging into her spiritual work. Up close, you can see that there is puckering and pulling (ie, this isn't the way things were meant to be).
And then, the fire begins! This is the first time I have used metalic thread, and I had SUCH FUN creating the licking fire. I really like the way the fire quilting turned out. I felt like I could create thread flames all day!
Dyeing fabric, take 1
I have never dyed fabric before. Actually, I am trying to paint raw silk using Setasilk from Darma Trading Co.
And this isn't just for fun in my spare time. Somehow I volunteered to paint 50 yards of it to use this weekend to change an old dining hall into a worship/gathering space. WHAT WAS I THINKING?!?!
Deep Breath.
OK. First things first, we should do some testing, right?
Alright. Let's start with one yard of raw silk (actually 1 yard washed and 1 yard unwashed so that I can decide whether it's really necessary to wash the other 48 yards).
Next, gather the rest of the supplies: Thinned paint, paint brush, gloves, cut outs for sun printing...
Paint fabric. Place in sun. Place cut-outs on top of fabric. Paint will leave the covered areas leaving white underneath the cutouts.
Wait.
After it is dry, take off the cutouts and...Ta Don't...sigh. That didn't work very well.
Back to the drawing board.
Wednesday, July 11, 2007
Learnings II: Just wait
A week or to ago, I posted about how I had ruined a nice little piece from Melody's workshop. Here it is:
Not so bad after all. Not a $750 collecter's item. But it would make a dandy coaster (for an oblong glass...)
Ironically, the same thing happened with my dog this last week. On the afternoon of the 4th of July, Roxanne began shaking as if she were incredibly afraid, wasn't able to control her limbs well, was jumping over imaginary things, listing to one side, and couldn't make eye contact.
I took her to the emergency vet and he thought poisoning, but gave her about 6 shots to cover many different things. Said she should probably be fine in 24 hours. She was better the next day, but all weekend she still would walk away from being petted, ignored food dropped from the table, did't wag her tail AT ALL for 4 days, and left a spot of pee every time she got up from laying down.
I made an appointment with our vet on Monday, fearing that there was no hope and I would have to find out more about euthaniasia and would have some really hard decisions to make in the near future. But when I got home to take her to the vet, she wagged at me and came over for a petting. I got her leash, and she about pulled me out of the door. She gobbled up cheerios from the car seat. My dog was back!
The vet said it was probably a Doggie Stroke, which textbooks say don't happen but he sees a couple of times per month. And she should make a full recovery.
Waiting is good.
Triangles (Not)
A few nights ago, both boys were asleep and my husband and I had a few free moments. He had the Tour de France on in the background, and I thought that I could do a few quick studies just to get my juices flowing.
I pulled out my fabric scraps and was draw to these three triangles:
I thought it'll be a nice exercise to come up with a quickie quilt using them. Here is what I came up with:
OK. Now I've got that out of my system, I'll Use Those Triangles. I was composing and talking to my husband about the Tour and watching snippets and came up with this:
I like it! Maybe it will be the first in a Tour series.
Now that I've got the basic fabric placed, where should I go from here? Do I need to add more elements? (I sort of like the simplicity...) Ideas on quilting? beading? or just let it be simple?
hmmm...
Thursday, July 5, 2007
Felted Soap
We had young and old house guests this weekend. A whie ago, I learned how to make felted soap and thought that would be a fun project for the kiddos. So my brother-in-law, 3 kids, and I got the supplies ready: A bowl of water, a bar of soap, and feltable wool (from rough sheep not smooth alpaca).
To felt soap, you simply gently rub a thin layer of wool onto the soap, moisten with water, and continue gently rubbing until it becomes felted (you'll feel it go from furry to firm). When that has happened, you add another layer of wool perpendicular to the first and repeat.
After you've built up several layers of the felt and there are no empty spots, you can add colored wool to make a wonderful design.
Here's my brother-in-law's soap. He and one of the children are natural felters. The other 2 kids were a little young (3 and 4 vs 6). And I am sad to say that although I've tried several times, I am a horrible felter! I'm not sure whether it is that I'm too impatient, or I'm rubbing to hard, or what. I'm just no good at it. However, I LOVE the idea of it, so will continue to invite others to do it and be humbled at this thing I can't quite master.
Oh! And when it's all done, you simply wash your hands or body like normal with the felted soap. And as the soap shrinks, so does the felt. When the soap is gone, they say you'll just be left with a little felt ball for your kids to play with in the bath, or to play with in the park, or to slice thru to make buttons or flowers or do any number of things with. Our felted soap is still 98.3% of it's original size, so I can't speak from experience about this, but I'm looking forward to playing with the felt ball in the kid's bath.
Subscribe to:
Posts (Atom)