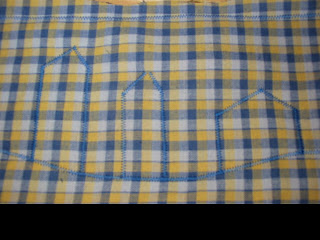
I've also been wanting to try the technique of sewing lots of layers of fabric, then cutting away some layers to reveal others. I've seen this done for abstract forms, but not for concrete forms. I thought I'd give it a try.
I used a pile of Blue and Yellows I had been given, and sewed around the outside edges, then sewed a line for the "ground". Next, I went back and sewed a variety of houses on the fabric:

Next, I cut out the top layer of each of my houses. Teeny tiny scissors are very helpful with this step.
(Note the baby monitor in the upper left of this photo, proving this to be true Nap Art.)

Then I cut each house out a different number of layers so that each house was from a unique fabric.
At first, I poked a hole in the middle and then cut diagonally to cut the house out. But then I realized I was able to start at a corner, and cut neatly around the edge, and then I had a perfect little house to use in another project. Can you say Series! ;)


Then, I went back in and sewed unique elements on each house--doors, windows, roofs, etc, and cut them out. This step could be done before the original cuts were made if you were a more organized, plan-it-out artist than I am.

And then, when the houses were done, I cut out all the layers of fabric on the top of the piece to reveal the night sky fabric that was the base for all of it. (This also gave me some wonderful Series Starters you can see if the top right of the above photo.)
I then added some flowers to the foreground and one house, and added a word on each house "Neighbors are nearby & far away" (note: must find better pens that Sharpies).
I cut the batting a bit smaller, fused it to the front, fused it to the backing, cut to size, and zigzagged around the edges.
And I even added the rod pocket.
A Completed Project. Yippee! (Sorry, no good photos of it. I'll try again and post something later.)

4 comments:
I was reading your blog and thought you might like to check out some quilts we are working on in my guild of our houses. The subject title is slice houses.
Yes! Your Slice Houses are wonderful! What a great idea. Now, I just need to find or create a guild... hmm...
I love this project! How long did it take? I don't have naptime, but I have 2 hours of preschool some days, starting in about 1 week...
Yes, Carin, you could do this in 2 hours one morning!
Do you have a decent sewing machine?
Do you have some fabrics, or would you like me to send you a little pile?
Feel free to call me while you're doing it if you have any questions--and then make sure to send me a photo so we can see what you did!
Post a Comment