Monday, December 31, 2007

Belated Thanksgiving Pics

Our family joined Charlie's godparent's family for thanksgiving this year. We rented a condo on South Padre Island, and the owner was clearly an artist. There were wonderful original pieces of art all over the house including:

This one, which was in the entry-area bathroom. I looked at it for a whole day before someone mentioned to me that it's a picture of a nude beach. The photo is just blurry enough for a Family Blog like this one. There's a stuffed boypart I think on the person with the red towel that you can't see here that just made me laugh. I'm a real fan of nude art in bathrooms--it just seems like a natural fit to me.


And in our friend's bedroom was this magificent pillow:


Here's a detail of the side view of the pillow:


What a surprising delight to be surrounded by original art on our vacation. We couldn't have planned it better.

(aside: It's GREAT to be back to blogging. My computer and I aren't friends yet, but we're learning how to work together.)

Inchies conclusion (part 1)

For those of you who like closure, I'll let you know that the Craft Fair went well. Our booth sold Plum Puddings, pen and ink drawings of our church, and Inchies. We made a little over $300. Not bad!

We've got many inchies left over. I'm going to make some into greeting cards and offer them and some of the other types to our diocesan bookstore to sell.

Thursday, December 20, 2007

Pause...

Oh, much is getting done.
But learning how to deal with a new computer isn't one of them.

When I learn how to upload pics to/from my new Mac laptop, I'll post my backlogs.
Target date: January 10.

Blessings!

Tuesday, November 13, 2007

Inchies Update

Today, Marilyn came to help add baubles to our inches:


And here are a few of the multiplying-like-rabbits inches we'll be selling at the Craft Fair on December 2nd:


Fun!

Thursday, November 8, 2007

Inchies, Part III: Finishing Touches

To keep the inchies from falling apart, you next need to zigzag the edges. I prefer sewing mine in nice, long rows:


Jo prefers to sew hers in grids and matrixes:

Here's what happens at the end of our workday. Jo attempts to wear them all:

And her is what I am most excited about doing with the Inchies right now--making double and triple pendant neclaces. As you're sewing one to the next, you just leave a bit of space and the sewing machine does a great job of twisting the two threads into a teeny, tiny cord to hang the next inchie. Beautiful!


Now, we'll have to see if anyone besides me thinks these are pretty nifty. ;)

Inches, Part II: From 12X12 to 1X1

After cutting into manageable pieces, you then add the fun stuff: threads, sparkly bits, etc. And cover with netting and or/tulle:


Sew it all down with fairly close-together random sewing. Remember these bits will only be an inch wide, and there should be several bits of sewing on each square inch. You can use freemotion or just sew lines and curves:


Next, cut the manageable piece into your actual inches. We are making some 1 inch by 1 inch, and others 1 inch by 1 1/2 inches (and a few bigger ones).
This handy-dandy cutting tool makes things a breeze! There are slots every 1/2 inch, so you don't have to reposition for each cut. Brilliant!:


Now you've got your basic Inchies:

Do the same with each of your Manageable Pieces, and you've got a whole farm of inchies:

Wednesday, October 24, 2007

Inchies, Part 1: Starting from Scratch

Our church is going to try to raise some money next month by having a table at the Gambier Craft Sale. We hope to be selling the traditional Plum Puddings from days gone by, and to also offer some other crafts.
Jo and I are working on creating "Inchies" for pins, necklaces, and whatever else we can think of. Most of them will actually be about 1 by 1 1/2 inches. I also am interested in making some reusable gift tags by putting a vinyl pocket on the back side to insert "to/from" papers.

Neither of us have ever made an inchie, but here's how we started:

1) Fuse a variety of background fabrics onto whatever stiffener we had around the studio:


2) Lay down some garish see-through fabric, with some threads and yard underneath for good measure. Sprinkle with 007 and iron. Notice the iron is melting the garish fabric. Play with the time/temp so it sticks but doesn't melt:

3) Cut into easily manageable chunks:

We then plan to do some freemotion quilting. I think after that, we cut then sew around the edges and finish with baubles and doo-dads, then add the pins or cord or whatever.
Stay tuned to find out for sure!

Tuesday, October 9, 2007

Sling Bling

My friend, Jo, has a show opening on Thursday and she recently broke her arm. She asked if I would be interested in making an art quilt sling for her (I like to think of it as My First Commission!) Of course, I jumped at the chance. What an honor!!

Friday, she brought me the supplies: a sling, leftover orangey fabric from her vest she'll wear to the opening, and a variety of fabric from her previous work:


I began by making a sling fabric template of batting:


And then fusing fabric to the batting. At this stage, the piece is "Helen's Style":


But then I decided to make it an Homage to Jo and added her style on top. In my mind, Jo's signatures are faces, bits of thread, and tulle ("the pizza").
LEARNING: Attempting to freemotion quilt before you have backing on is miserable. Batting is very sticky stuff! And yet, I persisted. I told Jo to keep her arm moving so no one could look very carefully at my craftsmanship.
I then simply zig zagged the quilt top onto the sling, used some of the orange material as binding, and then added a little button bling (since it IS for an opening!)


Here's Jo trying it on with her vest, sans Artistic All Black Underlayer:


I hear she's dyed the ugly white strap a fetching rust, and has done a little painting touch-up on the sling.

I'm not going to be able to attend the opening on Thursday, but I am so delighted that I'll be there in spirit AND she'll have a physcial reminder on her arm that I wish I could be.

Thanks for giving me this delightful project, Jo!

Wednesday, October 3, 2007

SpirARTuality 1

Yippee! This morning I hosted an amazing, fantastic, first monthly gathering of our women's SpirARTuality group.

Jo, Joanne, Deb, Susan, Chris and I got together in my back yard to paint fabric. Jo is the only one with any real experience in the subject, but I had plenty of supplies, and after taking a little longer than needed to set ourselves up, we jumped right in.

Chris spent her time on a wonderful representational piece I think would look great on her daughter's wall:


Deb spent most of her time in one colorway, but did a nice variety of pieces. Being a weaver, one of her stretches was to stay away from patterns. Her, she uses a pattern she later salted which added some neat variety to it:


I was prolific, as I always seem to be when given the chance to Just Do Art. A while ago, a pattern came to mine, 3 braids on one side and then circles on the other side. I used this in a variety of ways.
A few months ago, Jo taught me that you can use "any glue" to make a design and then paint over it and it's like quickie batik. I couldn't find any school glue during one naptime, so used wood glue instead (see 2 photos down at the bottom). After using it for 2 pieces, I looked more closely and saw that it is water resistant. So it may not wash out like Elmers.
Oh, well, this is all a learning process.

After the glue dried, I wetted the fabric and then threw some paint on it:


I then squnched it up as squeezed it until there was paint on all the fabric.
Here's my resultant fabrics. YUM!


The bottom 4 pieces in the picture below began being painted at the same time. I taped one to my cardboard, then the next right on top, next on top, and last on top. The one on the far left was my top painting. 95% of it was painted, I pulled it off and scrunched it and squeezed it and there it is. Then the next two pieces just screamed "let me be!" so I pulled them off without adding anything. The final piece was probably only 10% colored, so I had fun and used up the rest of my paint with flicking and daubing and then finally even rinsing in some green water.

And the piece at the top of the photo? My paint rag. ;)


As we were cleaning up, we reflected on a list of questions I created. (e-mail me if you'd like a copy). Everyone really enjoyed the morning. I think this group is going to thrive and grow.
Next month, Deb will be hosting us and leading some new art adventure.

Wednesday, September 26, 2007

SpirARTuality

One week from today, I'll be hosting our first Women's SpirARTuality morning. A nearby spiritual director and I came up with the idea. I've not heard back from her, but I'm charging ahead full-force as is fairly typical for me.

We'll be painting fabric in my back yard and reflecting on the experience. I've invited 8 women, so far 4 of us will attend. I've painted fabric once. Two of the participants have years of experience in painting and dying fabric. So it will be interesting to see how our morning goes. My hope is that I will provide supplies and and the time/space, and that each of us will do our own thing or collaborate as the Spirit moves us.
At the end of our time, we will have some reflecting/journaling questions about the event.

Suggestions are always welcome.

Saturday, September 8, 2007

Pop Art Fabric Art

Way back in Lent, I decided to spend a few minutes each day doing art. I imagined that I'd spend the whole season working with people and faces. I made some fun little stick puppets of our family and friends, but then did other things most of the time. Near the end of Lent, I came across this site about how to turn family pictures into pop art. I was intrigued!

I knew virtually nothing about our Photoshop, but we took some photos and my husband taught me the basics. I had TONS of fun altering each mug shot to be a paper pop art piece.

I then cut the paper pictures into component pieces and used them as templates for fabric, and created this:


It was definitely only "play" and a study, but it was fun and I learned alot (like when using cheap Walmart fabric things show through--see hubby's yellow shirt)


I especially like adding the hand-sewn details of my highlights


And our baby's fuzzy head:


All in all, a fun learning project. I commend it to you!

Thursday, August 30, 2007

House series

I have lots of house shape to play with from my Neighbors are Nearby and Far Away piece. I'm calling my series "Glass Houses" although some/many of them won't actually be Glass Houses.

I'm calling them Glass Houses because they are just the right size to be a coaster, to hold your glass. And they have houses on them. Thus, Glass Houses.

Here is my first one, sent to a friend.


Here's my second one. I made it for a friend's youngest child who attended a Happening weekend with her church. Unfortunately, I didn't hear about it in time to get it to her during the weekend, and now I'm too shy to send it to her late. Somehow, it seemed like it would be a really neat and special gift along with a bunch of other gifts and notes and such that she would get during the weekend, but it might be a Weird and Uninvited Piece Of I Don't Know What if I send it to her now. So it's sitting in my studio.


And here are the other Glass Houses bases. Aren't they a pretty lot?

I have a few pieces that are villages. Here is one I'm preparing to take to a freemotion quilting class next week. (I'll keep it hidden until I figure out if they will kick me out if they know I'm an art quilter instead of a traditional quilter!)


And another village that I started playing with and it became a Mediterranean Village:

I am realizing I have no sense of when I'm really "done" with a quilt. Anyone out there know if that's something that you learn, or something that develops as you do more, or just an inherent skill I don't seem to have?

Tuesday, August 28, 2007

Adoption Wall Hanging

Ooh! I just sent off my favorite piece ever!

Earlier this year, my friend Carin's family adopted a son. They also were fostering another child and I spent months trying to come up with just the right gift to share in their joy. I never came up with anything. However, I continued to percolate.

Just last week, we got an adoption anouncement from our friends the Camerons that their youngest son was now legally theirs. And in about an hour, this delightful little piece was created for them:


It's not the best picture. Maybe someday I'll get better at that. However, you can see the elements.
It uses one of the outlines from the "Neighbors" wall hanging from a few weeks ago. And I stamped their name onto the house. Then I cut out a heart for each one in the family, and since I had a little space and they're church folk, I added a cross. Then I used metalic thread coming from the cross in the house and running through each heart, connecting them.

(I hope they like it as much as I do. It's so fun to do things I like and I'm able to share. This art stuff is cool.)

Tuesday, August 21, 2007

Let's SWAP!

I returned to the previously mentioned going-out-of-business store. Oh, my.
I bought another 1,000 buttons.
And enough upholstery to recover everything in our living room--but we've got little kids so there's no point in doing that for another 15 years. So I guess I'll have the bolts of fabric in my studio for the next 15 years.
And here are some photos of other things I couldn't resist.

They had a 3ft x 4 ft x 4ft big FULL of iron-on embroidery patches. It was impossible to look thru them all, so I asked for a bag and threw in anything that looked vaguely interesting with the intention of picking out my 20 favorites. I set the bag on the counter and kept looking. When I returned, it and some other things were all counted and tied up together and I forgot about my sorting plan. So I came home with 300 more of these things than I intended!


And oh, this lovely beaded fringe!


And I have no idea what this ball fringe could be used for. But I have such FABULOUS memories of my mom's stash of ball fringe when I was a baby. It brings intensely happy, safe, comfortable, fun memories to me because of having it hang on my crib, and being pinned on to my pants when I was pretending to be some animal, and that it was in one of my mom's lower drawers in her sewing room--one than I played in when I was a tiny tot.


SO, now I've got alot of some similar things, but would instead like to swap some of my things for other's things. I've got lots of yarns, some fabrics, notions, doo dads, and of course all of the above.
I'm inviting all bloggers to swap a small-sized priority mail box full of stash goodies with me. If you'd like to do this, please leave a comment (and add a link on your blog if you feel so inclined). I've got lots to share, and am looking forward to broadening my stash. My goal will be to do 20 swaps with folks in 2007. Can I do it?

Tuesday, August 7, 2007

Goodies!

Being brand new to Art Quilting and to making time for art in general, my stash of goodies is way too small. However, a few weeks ago my friend Penny took me to a nearby town where there is a fabric store going out of business and everything is 75% off. WOW. Their selection was limited, but I was entranced by their button selection. I came away with 273 buttons.


I put them in little jars: Sparkly Ones, Animal Ones, Vehicle Ones, Hearts, Flowers, Big Ones.


Slowly, I'll create a delightful little stash...

Monday, July 30, 2007

Neighbors are Nearby and Far Away

Way back in February I had the idea of making a piece that had the houses of several close friends and our house, all linked in some way. I asked the friends for quick photos of their homes, but never got the photos. So the project slipped into the recesses of my mind. It was resurrected this weekend when I read about Deborah's "Homegrown" piece. Something about it stirred my need to do a house piece.

I've also been wanting to try the technique of sewing lots of layers of fabric, then cutting away some layers to reveal others. I've seen this done for abstract forms, but not for concrete forms. I thought I'd give it a try.

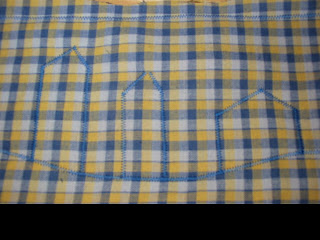
I used a pile of Blue and Yellows I had been given, and sewed around the outside edges, then sewed a line for the "ground". Next, I went back and sewed a variety of houses on the fabric:


Next, I cut out the top layer of each of my houses. Teeny tiny scissors are very helpful with this step.

(Note the baby monitor in the upper left of this photo, proving this to be true Nap Art.)


Then I cut each house out a different number of layers so that each house was from a unique fabric.

At first, I poked a hole in the middle and then cut diagonally to cut the house out. But then I realized I was able to start at a corner, and cut neatly around the edge, and then I had a perfect little house to use in another project. Can you say Series! ;)


Then, I went back in and sewed unique elements on each house--doors, windows, roofs, etc, and cut them out. This step could be done before the original cuts were made if you were a more organized, plan-it-out artist than I am.


And then, when the houses were done, I cut out all the layers of fabric on the top of the piece to reveal the night sky fabric that was the base for all of it. (This also gave me some wonderful Series Starters you can see if the top right of the above photo.)

I then added some flowers to the foreground and one house, and added a word on each house "Neighbors are nearby & far away" (note: must find better pens that Sharpies).

I cut the batting a bit smaller, fused it to the front, fused it to the backing, cut to size, and zigzagged around the edges.
And I even added the rod pocket.

A Completed Project. Yippee! (Sorry, no good photos of it. I'll try again and post something later.)

Felting so easy a preschooler can do it

I may not be any good at felting soap, but I can do Ziplock Felt. It's a breeze, is really, fun, and I need to find a way to use the felt before my house gets overrun with small felted pieces. ;)

Here's how to do it:

Step 1: Take a 6 inch piece of wool roving. Pull it sideways so it thins out to about square, or maybe 4X6. Place it flat on a table.
Step 2: Repeat step 1, placing it perpendicularlly on top of the first piece (bottom fibers go north/south; next layer fibers go east/west)
Step 3: Repeat again.
Step 4: Using colored roving, pull off dime-sized pieces and place on wool to make design


Step 5: Carefully put wool into a ziplock bag. Add around 1/2 cup of hot water with 1/2 t dish soap (like Dawn). Squeeze all the air out and zip up.


At this point, you can finish now, or just leave it and do the squishing part anytime over the next few weeks.

Step 6: Roll up one way, squish squish squish.
Roll up another way, squish squish squish.
Kneed the felt however you feel like doing it, but make sure the wool all stays in it's flat original layers--don't let it fold over itself or the fold will be felted into it and you won't be able to get it out.

You can make a bunch of these little baggies, and keep them in the car to play with on car trips, or in your purse if you get caught in a boring meeting or a long line. FUN!

Any time you'd like to check it, just open the ziplock and feel the fabric. If it's all bonded together, you're done. If not, get the air out, close up the bag, and keep squooshing.
It will get firmer and firmer (and smaller and smaller) the longer you felt it.


When it's felted, take it out, rinse, and let dry.
Ta-Da!

Wednesday, July 25, 2007

What?! It's NOT all about ME?!

I made a conscious choice to find/allow others to hang the big wheat and water pieces I did with Jo, Anne, and Sara. I thought it would be very stressful for me to Try To Make It Perfect.

I didn't realize how stressful it would be for me to see something VERY different from what I had envisioned. The hangers did a great job with the parameters they had to work in. And I'm very glad I wasn't there for the hanging-- I would have gone all Control Freak, I'm sure.

I imagined the wheat pieces hanging from dowels from the drop ceiling so that you could see both sides, they would move in the breeze, and the would create a feeling of openness but also define the space. It would be a lovely worship area unbesmurched by anything else.

However, I didn't know that several others were also working on schemes to transform the space. And I'd forgotten that the same space was also going to be used for the program and for displays for a variety of different groups.
Thus, we get:

A plastic banner and an Episcopal Flag flanking The Art, with a hard plastic sign slapped right on top of it. Oh, the horror. (Get over it, Helen!)

And if you look to the right of the water in the picture below, you can see part of the Wall-O-Tee-Shirts that someone else had made to transform the space. And the pole for lighting just in front of one of the wheat pieces.


But then look here. This looks fine. (I still would have prefered to get rid of that heavy black curtain. But not bad...)

Oh, do we ever really learn that it's not All About Us?