Thursday, March 6, 2008

7 Random Things

Connie from Life Scraps and Patches has tagged me to list 7 random things about myself, and then tag 5 others.

1) As of TODAY, I am a La Leche League Leader. My group is a Toddler/Tandem group, specifically for moms nursing a child over a year old, or more than one child.

2) It took me 38 years to realize my favorite color is blue (periwinkle, really).

3) I sleep on a king size bed, but only use a couch sized throw to cover up with.

4) I share a birthday with one of my very best friends.

5) Half the fun of my vacations is the time I spend planning them. I love learning about the place, the route, things to do, etc. (My husband sometimes thinks it's a bit obsessive...)

6) At our wedding, all the ushers and groomsmen wore real gerbera daisies that were fitted with a squirting flower mechanism and I wore flowered flip-flops.

7) I believe every blog post should contain a picture.


Now I'm supposed to tag 5 others. Let's see if I can find 5 who haven't been tagged yet:
Carin, Quilt Pixie, My hubby, Deborah's sis, and...Diane whom I just found by hitting the "random" button in the Artful Quilter Webring.

Now, go see if they've listed their random things.

Wednesday, March 5, 2008

Fabric Bowls II

We found that Fabric Bowls can also make jaunty hats!


And because I chafe so much at having to follow precise directions, I had to do another free form bowl after learning the basics. This is an electric lime and fuchsia even though it looks yellow in the photo.


Oh, and when I took the black and white bowl into the basement, I found out that the eyes in the faces are glow in the dark! How fun is that!?! What a great extra surprise from my swap with QuiltPixie

Fabric Bowls

Our SpirARTuality group met this morning to make Fabric Bowls. I LOVED IT!!!

We used to book Fun, Fast, and Easy Fabric Bowls and the book really lives up to it's name.

Step 1:
Cut 2 12 1/2 inch squares of contrasting fabric and 2 5 inch squares of a third fabric.
Also cut a 12 1/2 inch square of either Pellon 70 that has fusible on it OR timtex and 2 12 1/2 inch squares of WonderUnder (I used the Pellon. It was so easy!)


Step 2: Make your big sandwich--fuse the 2 fabrics to the stiffener.

Step 3: On one fabric, mark a line down the middle (6 1/4 inches) both ways, so you've divided it into 4 equal squares.

Step 4: Position one of your small squares so that a point of the small square lines up with the each line you drew (basically step 3 and for are just so you can center the bottom portion--it doesn't have to be that difficult!).


Step 5: Sew around the small square. Turn over. Position other small square on top of sewing lines. Satin stitch around edge. This will satin stitch both small squares down.


Step 6: Draw a line from the point of your small square to the edge of the big square. Cut a V out of it, with the point of the V being 1/4 inch from the small square:


Step 7: This step takes some real strength! Also, it's like freemotion sewing. Do NOT reposition your hands unless you stop sewing!!
Put your fabric into the machine so the presserfoot is at the corner of the small square. Satin stitch forward, and as you do, slowly (and this takes lots of muscle!) push the fabric so the two sides of the V are flush with one another as you are sewing.
You can't put the V together all at once--then it's too shaped to sew. But if you do it little bit by little bit it will work.

Step 8, 9, 10: Repeat step 6 & 7 on the other 3 sides.

Step 11: Satin stitch around the edge of your bowl:


The Spiritual Questions (metaphorically of course) that went along with today's project were:
Hold your bowl. Imagine it is an empty space waiting for something. If God could give you anything, what would you ask for?
Now imagine God has an empty bowl like this. If you could give to God anything you'd like to get rid of from your life, what would you give to God?

As the Deer longs for the water-brooks

I'm excited about a little triptych I've finished recently. It's one longer piece and 2 smaller pieces. All hand-painted fabric. The background is silk and the squares are cotton. The sticks are from my back yard, and although it doesn't show up in this picture, there is some light blue stitching meandering across the larger piece that is to envoke the idea of a stream.


The triptych is named for Psalm 42, verse 1 "As the deer longs for the water-brook, so longs my heart for you." There's a wonderful hymn setting of this song that I was humming to myself as I made these. The large one is called "As the deer longs for the water-brooks" and one small one is "so longs" and the other small one is "my heart for you."


I'm really pleased with the way these turned out. They're rough around the edges in a very organic way. MMM!

Tuesday, February 26, 2008

CyberFyber

Fiber artist Susan Lenz is putting together a show entitled, "CyberFiber" and part of it will include 163 fiber art postcards from artist that also blog. She had an open invitation to anyone who blogged, so I signed up!

Susan actually made 163 postcards herself, and then each artist could chose one of Susan's postcards to get in exchange for theirs. I chose her postcard #154 and it arrived in an amazingly short time:


It took me a couple of days to send my "Amoeba" postcard back to her because my toddler tinkered with my sewing machine and now it won't run. I had to take my fabric, backing, and thread to a friend's house to finish the edges.
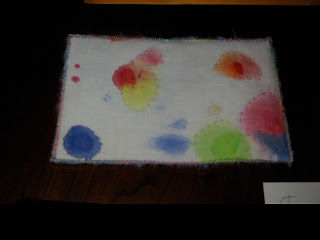
I've got several "Amoeba" pieces of different sizes. They came from our SpirARTuality group's summer fabric painting day. When I painted, I taped on 3-4 layers of fabric, and the Amoeba fabric are the ones that were nearest the bottom of the pile. Only bits and spots of fabric soaked through. I really love the look of it. I then take simple thread and sew around the blobs:


My work is going to be in a show! (With a thousand other artist, but it's still exciting.) Thanks, Susan!!!

Paper Fabric Notebook Covers

The SpirARTuality women made journals out of our Fabric Paper (Paper Fabric?).

1) Measure your notebook. Decide whether you want to just cover the front, or wrap around. If you want to wrap around, make sure to measure the book while closed so you have enough fabric to cover the closed spine.


2) Put glue all over the cover. We found Tacky Glue to work just as well as the smelly lethal stuff:
3) Cut your fabric paper to size and glue onto notebook:


Here's another example if you're feeling a little less dramatic than I was that day:
I love that it's using a pattern piece. Delightful!!

Making Fabric Paper

Our February SpirARTuality task was making Paper Fabric (or is it Fabric Paper? I don't really know) with MistyFuse.

1) Lay Parchment Paper on your work surface.
On top of that, I put down a layer of scrap fabric as my base, then a layer of MistyFuse, then this tissue paper, and ironed:


2) Next, another layer of MistyFuse. Sprinkle on more stuff,
Protect your iron by covering with parchment before ironing:


3) Repeat step 2 another 2-4 times.

4) When your collage is done, top with a layer of MistyFuse and a single layer of netting, tulle, etc:

See next post for final product.

My friend Jo loves MistyFuse. I didn't care for it all that much. It drapes really well, but I like my fuser to be stiffer so it's not always making wrinkles or scooching out of place. I'd use MistyFuse again, but wouldn't pay more for it than WonderUnder.